Outdoor lover. Lecturer and scientist at the University of Kent (and a bit of an engineer, as well!). Rower. Runner. Road cyclist. A bit of a geeky nerd, too. All opinions my own.
And now for something completely different!
In this video, I’m doing some barefoot running in sunny California. I will talk about some usability issues, and also test how waterproof the watch is!
Epson has very kindly sent me this unit to test as part of their 100 Epson runners programme. In exchange for leaving 5 reviews I am allowed to keep the Runsense which I tested without charge.
In this episode, I took the watch on my first run which took place in beautiful (albeit muddy) Blean Woods, on the outskirts of Canterbury, Kent.
I delved on usability and the data the watch provides, along with the issues I’ve had with connecting the watch to my Android phone.
Epson has very kindly sent me this unit to test as part of their 100 Epson runners programme. In exchange for leaving 5 reviews I am allowed to keep the Runsense which I tested without charge.
In this episode, I unboxed it and briefly played with it after powering on. Stay tuned for the next videos! (and apologies for this very long, monochordic video – it is getting better the more videos I make, I promise!)
Epson has very kindly sent me this unit to test. In exchange for leaving 5 reviews I am allowed to keep the Runsense which I tested without charge.
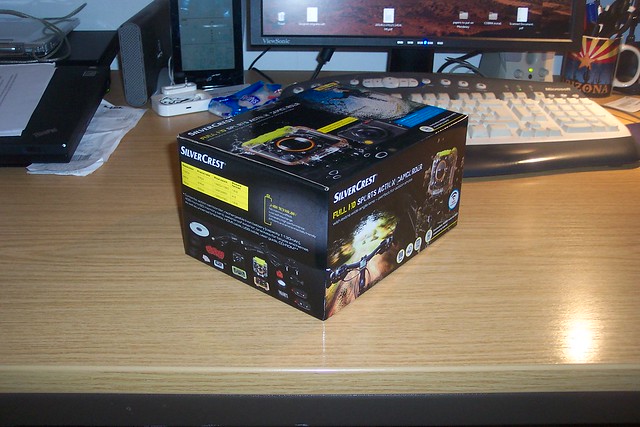
So yes, last week after a short love affair that started with a Lidl catalogue I went and got myself an action camera from Silvercrest, aggressively priced at £79.99, but with similar features to those of a far more expensive GoPro.
It came with a whole array of accessories, including two sets of cases (one water-proof, one splash-proof which features some holes to enable the camera to record audio through its built-in microphone), loads of different mounts and straps including a bike handlebar mount (which should also be compatible with a rowing shell’s outrigger).
The camera itself can record Full HD video @ 30 fps, or 720p @ 60 fps. It has a few nifty features which I have yet to explore, including time lapse and wi-fi remote control & viewing (I had to install an app from Google Play for that; there’s also a version available for iOS).
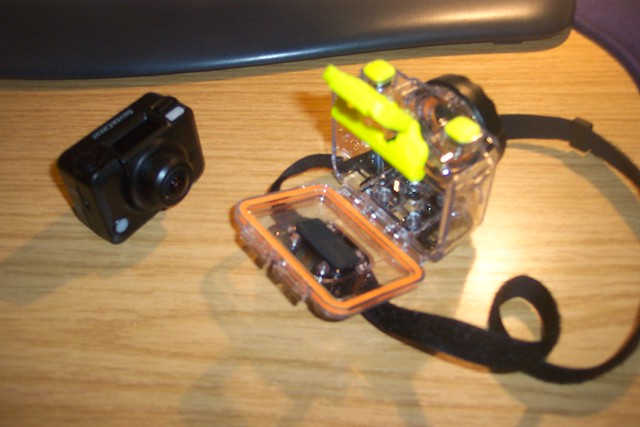
The camera with its fully waterproof case (to 60m) and velcro strap – I used this configuration when I took it out for a quick run last Sunday, worked well! (although in the beginning it was pointing quite a lot towards the sky…) Apologies for the lack of focus, I was messing around with my point-and-shoot camera and didn’t pay much attention to the distances! 🙂
Can’t comment on the battery life as I haven’t done a full cycle yet – got it with about 1/4-1/2 of the charge and took it for a 40′ run on Sunday, didn’t manage to deplete it completely! I will write a follow-up post once I get to use a bit more (and perhaps under some nicer weather).
As for the video footage, here it is in its 720p-glory (after a bit of encoding). For some weird reason when I post-processed the video (with kdenlive) it rendered it with a lot more time (1h36m!), filling the end of the clip with black frames. I still need to optimise that, work in progress! 🙂
The track itself, to be absolutely honest with you I think it was the first time I actually ran it (!) – I’ve obviously done parts of it, but this particular loop was a novel configuration, mostly chosen to avoid muddy bits (I am too lazy to scrub my trainers after a run and plus I was running with my newest set, which are still looking rather nice! 😛 🙂 ).
The route:
Starting from Tyler Hill, I headed to Blean via Tyler Hill Road (those two bends next to Hothe Court Farm are a bit dangerous, I wouldn’t dream of doing that bit wearing headphones as it is basically a blind bend on a road with no pedestrian paths!), then took the A290 (Blean Hill) towards Canterbury, passing through Rough Common and the junction with Giles Lane (towards the university campus).
Afterwards, I followed the National Cycle Route 1 down the hill, through Neals Place Road and ending up in that housing estate next to London Road. Ran Westgate Court Avenue all the way till its junction with Whitstable Road, and descended a bit more into town, turning left just a bit before the St Dunstans roundabout.
Followed Beaconsfield Road until the junction with St Michaels Road (a popular route for people cycling into the UKC campus given that it links directly with the Eliot foot/cycle path) , from there I followed the foot path up to campus. Crossed the campus until its eastern end (Darwin), and took the B2205 back into Tyler Hill.
But since I was still about 400m away from my 10k goal I decided to do a few silly loops around the village until the Garmin finally acknowledged it (the locals probably think I’m crazy, but then again there weren’t that many people outside with that fantastic weather! 🙂 )
Right, before this turns into a running-only post, just to sum up the camera: so far I liked it, the OLED display is very good, should be very readable under direct sunlight (can’t verify that for a while, though…), the recordings are made in MP4 in a fairly Linux-friendly codec (I have the bad and ugly gstreamer plugins, though…), not requiring any special software (some basic video editing software is included in the package, but it being Windows- and Mac-only meant that I couldn’t really do anything with it …). I still have a significant amount of testing to do, but for now I’m quite happy. I do intend to get the optional RF remote that can be ordered separately, which will allow me to start recording remotely without having to use my phone (useful if I’m on the boat, especially considering that the remote comes in the shape of a wrist-watch…). Keep tuned for more videos, hopefully I should make a few more soon!
After getting my new “old” monitor I am now running my ThinkPad with the lid closed off its docking station, much to the dismay of my grandad who cannot “see” me now. I then went to get the cheapest webcam that I could find which would be Linux-compatible (and stress-free).
The Jazooli had reviews on Amazon with people successfully running it on Ubuntu with apparently no big dramas, plus it was only £1.99 (+£1.99 P&P 🙂 ), so I went for it. It features not just the camera itself, but a built-in microphone (great since the inbuilt mic of my laptop is on the screen bezel and, as mentioned, the lid is closed..) and 6 LEDs whose brightness you can control through a little knob – for those occasions where you are working in semi-darkness and can’t be bothered to turn a light on if someone calls you on Skype!
It arrived relatively quickly (although I feel that things off eBay with free delivery tend to arrive sooner than the ones from Amazon, even the ones specifically fulfilled by them!), and I immediately set it up on top of my monitor (it has a hook in its base which secures the camera in place, quite a clever design, and it can also be used with a laptop screen!). Plugged it and fired up Cheese to test it – perfect, although its claims of 16 MP are grossly exaggerated – this is a VGA (300k-pixels) sensor, and it can only do VGA at 15 fps anyway, which caused some issues with Cheese. Lowering it to 320×240 seemed to do the trick.
I started having trouble when I fired up Skype and started a video call to test it – Skype was pulling the default configuration and assuming the maximum resolution of the camera, which obviously wasn’t going to happen, and as expected the video feed froze and crashed.
After editing the Skype configuration for my Skype name (under ~/Skype/yourskypename/config.xml ) and adding the following tags to the file,
I fired up Skype again and hoped for the best. Nope, it was still happily pushing the video feed at full resolution and obviously crashing. Moreover, with Google Hangouts I had exactly the same issue, which led me to think that maybe this was something transversal to all of these programs (but Cheese). After doing a bit of research and installing some Video4Linux configuration/testing software, I did what normally solves 99% of the problems I have when running a 64-bit Linux system – symlink libraries, in this case v4l1compat.so, which existed under /usr/lib/libv4l but not under /usr/lib64/libv4l.
And that seemed to do the trick – both Skype and Hangouts now work perfectly with no frozen video. And to top it off, this camera behaves much better than the ThinkPad’s integrated one, both in terms of white balance (I no longer look like I have liver disease, the other camera made me look so yellow!) and low-light performance (the camera would just shut itself off if the light level was below a certain threshold!).
It gave me some trouble in the end, but nothing major (and probably related from running a 64-bit version of Fedora… 😛 ). For 2 quid it is a good buy indeed – obviously not HD, but my family is not complaining… 🙂
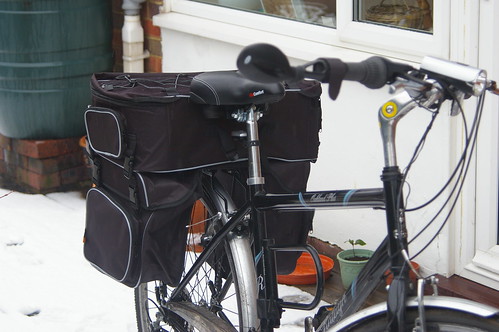
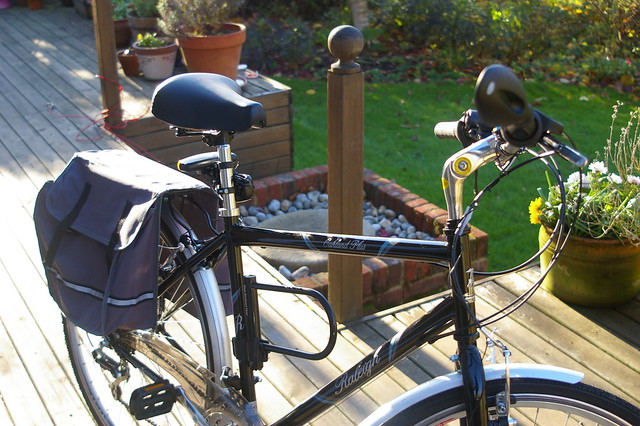
As a consequence of my shopping trip last Thursday I got myself a new set of pannier bags for my Raleigh. This set, which retailed originally for around £16-£17 (I got it at a reduced price because it was the last one on the shelf) is a triple bag one, with two side panniers and a top, removable one.
Installation was very, very easy and the thing seems quite sturdy and well secured. With the top bag installed the bike has its “expedition mode” engaged!
The side pannier bags are slightly smaller than the ones I had before, probably because they are a bit more rigid (they sort of maintain their shape even when nothing is inside them). Still, I could fit a box of 2x frozen pizzas and 2 pints of milk in there without any issues, and for everyday use the two side ones are perfectly fine to carry some groceries, waterproof gear and personal items. I also liked the fact that there are two bottle holders on the back of them, along with some reflective material. In addition, the two side bags are locked in place using the rack’s spring – so if you want to put anything on top of the bags and secure it with the spring (eg a basket), you can! 🙂
The top one is a different business altogether. It is really big, has additional storage on the sides and some bands on top to fit some extra things outside. The main idea is that you can take it out and use it as a “regular” bag, since it has a big comfy handle and also included a shoulder strap. Fitting it in and out is also effortless – 4 quick-release plastic fasteners and some velcro to help keeping things steadied.
With the top bag removed now. You still have the regular pannier rack functionality (ie, you can still use the spring-loaded fastener), with the addition of two handy side bags, and some extras!
Apparently the set is not waterproof, which is why they include a plastic cover to put over the bags when it is pouring hard – but that kind of rain is rare around here, and with misty weather the regular protection is just fine!
This was a “spur of the moment” buy, as this set was not even advertised on last Thursday’s promotion (seemed to be old stock), but for £15 it seemed a really good deal, as I struggled whenever I needed to carry stuff which would simply not fit in my old side bags – I had to remove them altogether and then use straps with hooks to fit a bag in there. Normally that would happen with my gym bag. With this triple set I can simply ditch the gym bag altogether and put all the gear in the top bag! And it also works great for carrying extra groceries, too!
All in all, a very good buy, so far I’m very, very pleased with it! 😀
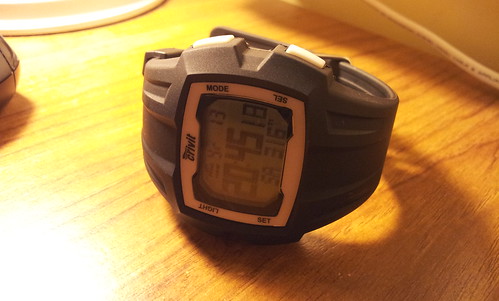
So, here it is! Last week I got a new gizmo in Lidl, a “spur of the moment” buy – well, in my defence I had seen it in the catalogue before, but since I was considering getting a bluetooth heart rate monitor to interface with my Android phone I didn’t give it that much thought. Anyway, when I went last week to Lidl for my groceries I had a long look at it and in the end the relatively low price (£14.99) convinced me 😀 .
It is quite full-featured (the user manual is quite sizeable, too!), having “regular” watch mode (eg comprising time & date, chronometer, alarm and even dual time zone support!), pedometer mode and HRM mode. The good news is that these functions are not independent, ie you can go for a run whilst tracking your heart rate and seeing all the relevant information on the screen, which albeit tiny is more than enough in terms of legibility (and it even has a blueish back-lighting to help when going for runs in the dark).
Aesthetics and ergonomics
OK, in terms of aesthetics is not the prettiest watch you’d find; it is quite bulky too, which is why I won’t retire my Casio – I’ll just take this one out of the drawer whenever I want to go for a run, as it is too big for everyday “normal” use. It is not as waterproof as my Casio, too – the manual states a tolerance of up to 3 bar, which according to them is just rain- and splash-resistance. Shame, I won’t be able to use it on the boat!… (anyway, for that I plan to get a cheap, waterproof Android phone and a Bluetooth HRM, as soon as my savings allow for that!…)
But it is functional, and the aforementioned display is good enough to accommodate the speed or HR as you’re going along in quite big digits, along with an accompanying graphic which, in pedometer mode will tell you if you are trending towards an increase or decrease in speed, and in HRM mode it will graphically tell you where your current HR is in terms of the typical minimum and maximum brackets for your age range (very handy!). There is also a bottom row with additional information which can be customised, eg you can select to have the distance run displayed alongside the speed, or your current heart rate, or your average speed… the choice is yours :).
The actual heart rate sensor is mounted on a chest strap (as all HRMs are), and I had absolutely no issue with it, and it seemed relatively comfortable in the 7.5k test run I had on Thursday. Probably in longer runs it might prove worse, I have to test that properly but unfortunately I don’t have proper long, uninterrupted running trails around here like I do in Porto, so that will have to wait for the Summer holidays! 😛
Functionality and user interface
As I mentioned before, the screen is quite good in terms of the amount of information it can display. The user interface is also quite simple to navigate, and I only had trouble finding some advanced settings because I didn’t read the user manual properly (more on that later). The rest is just a matter of navigating with one key and confirming with the other, and long-pressing to reset the counters. Nothing more simple!
The communication with the HR sensor is also quite simple (and apparently it is coded, so I won’t have problems with running with people also wearing HRMs!), the only issue is that you need to moisten the sensor in order for it to make proper contact with the skin, but that seems to be the case in most sensors out there…
One thing that I really liked is the fact that the timing will automatically stop when you are stationary (since it is detecting both my footsteps and the lack of them!…). Running in an urban setting here in England requires continuous stopping, as zebra crossings are rarer than the actual zebras around here, and the general rule to crossing a road is to cross anywhere, provided that there are no cars coming, which may work if you are walking but it is really annoying if you’re running. I would have to manually stop and start my stopwatch whenever that happened, which was not ideal, especially since I couldn’t hear if the action was actually carried out (I use earphones), and in the end I’d be continuously checking my watch to see if the timing was still on (and try doing that at night, even with a backlit screen!).
It also has some very neat stuff, such as memory of the highest/lowest/average heart rate, and fitness mode, which consists in measuring the heart rate drop along a specific period of time, which will assess your recovery after a strenuous exercise (of course you can always do this with a stopwatch and taking heart beat counts during 15 seconds, but it is much simpler this way!! 🙂 )
The only real issue I had with it, which was really all my fault, was related to the calibration of my step. Following the typical male technocrat attitude, I only skimmed across the (quite sizeable) user manual and skipped the section on pedometer calibration in its entirety. And the result was quite evident: the 7.5k test run I had on Thursday was counted as only 5k, and I could see during my workout that the “instantaneous” speed would never go over 10 kph, which is quite low for me, as my average pace is slightly below 5:00/km, which in kph should be exactly 12! (I have been ill and only returned to proper running recently, but still!…)
After that, I went to the troubleshoot section of the watch and there it was, written exactly for fools like myself, that if the speed readings were not presented correctly you’d have to calibrate the device. And actually the algorithm is quite sophisticated, as it takes into account a lower and an upper limit, which are configurable, and then asks you to run and walk a predefined distance to assess the size of your step. After calibrating it with a 400 m track I went on a test run again (I had the motivation of testing this watch, otherwise I wouldn’t have gone out as the weather was horribly windy and damp!) and I had a much lower error of about 300 m in a 4.5k run (and this time the error was by excess, it overestimated the distance ran). I will still do some additional calibrations, as I feel that I’ve set the higher limit too high (13 kph, when I normally run at 12!) and I’ve also used a quite short calibration track – next time I’ll do 1k, which is exactly two laps around my cul-de-sac.
◊/◊
In conclusion: for a fraction of the cost of a Garmin specialist runner watch (they retail for well over £100-£200!) you get something that will most definitely help you assess your running workouts (and they also thrown in a bicycle holder to use the watch as an HRM during a bike ride!). Obviously it doesn’t have exactly the same level of functionality (you didn’t expect GPS and data export from a £15 device, did you?), but if used while aware of its limitations it can serve you quite well. A must buy, definitely! 🙂
… and also a sort of a status update, since it has been a while since I last did that. Starting with that, then, I can finally say I am properly settled! Regarding my postgraduate studies, I am now fully registered, enrolled, contracted, and whatever other formalism they can throw at me.
Honestly, I am fed up of bureaucrats (I thought general services were only slow and inefficient in Portugal, but turns out that in here it is roughly the same thing, since it took them almost a month to actually do something as simple as forward me a couple of forms for me to sign and give the relevant details regarding my postgrad teaching assistantship position. Oh well, all is sorted now, and one should not look back, only forward! 🙂
In the meantime, my work in the lab and in the classroom (which is also a lab, but a teaching one) have progressed steadily, which is what one should expect.
The overall experience has been quite positive, even though I am sometimes annoyed at some things: for instance, since I’m a first-year postgraduate student, I have to attend a certain number of research seminars in my School – and that would be OK if they were aimed at a general audience, but these research seminars are aimed at a very specific area of expertise, one specific to one of the four research groups in the School (Applied Optics, Astrophysics, Functional Materials, and Forensic Science).The two last ones I went were quite OK, especially the last one which was in the Engineering School (my fellow coursemates will be laughing out loud when they read this, because some of them have a very strong opinion on scientists and engineers… 😀 ), but the first one was simply too Chemistry-focused for my taste (the only bit which interested me was the actual measuring device they used, but that was not the main focus of the talk…). I like to be encouraged to attend those seminars, not forced, which was a bit of a let-down to me. Anyway, it is only an hour per week, when they do appear, so it is not a terrible waste of time…
OK, enough talking about work (it *is* Sunday, for heaven’s sake! I am not supposed to be thinking about work on a Sunday, even if sometimes I have to…). Let’s move on to the (hopefully short) review… of my new bike!
and here it is, under a rare morning sun (a few hours after this photo was taken, it was already pouring down again!…)
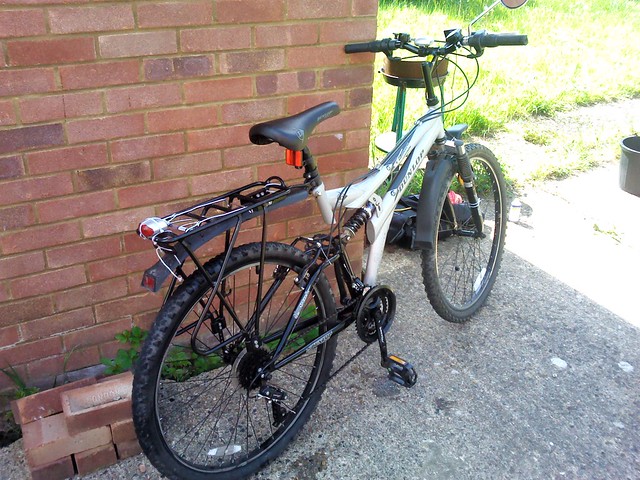
For starters, you may remember from previous posts elsewhere in a certain social network that I’ve bought a beautiful grey Dunlop mountain bike for a very, very low price (paid £50 for it on SportsDirect) this February, so why am I getting a new bike now, not even a year after it?
this is the Dunlop bike in question, in case you haven’t seen it already. Featuring a few aftermarket additions in a McGyver kind of way, such as the rear mudguard secured by a piece of string, or the back red light held in place by some cable ties! (by the time this photo was taken I still hadn’t replaced the original saddle, which was terribly uncomfortable.)
Well, the Dunlop bike is fine (apart from the back brake that needs new callipers, but that’s a minor issue), but the major problem with it is that it is 2000 km away from me, in my house in Portugal :). When I left Canterbury back in August, my plans were to return here in one years’ time or something like that, and not after a couple of months. If I knew that I wouldn’t have shoved two big suitcases, two smaller ones and a bike box, plus two people into a small little purple rented Peugeot 107 and driven all of that to Gatwick Airport, because then all those things I so efficiently dispatched home would be already here. 🙂 As you saw, that wasn’t the case, and since I was not contemplating the idea of dragging an additional bike behind me alongside a big suitcase and a backpack through multiple train rides on my way from the airport I used the opportunity to get a better one.
I mean, a mountain bike is fine when you’re on the mountain, or, at least, in some more off-roady trails – but to use it for commuting and shopping one wants preferrably something with skinnier tyres and a more rigid frame (the dual suspension system I have in the Dunlop also doesn’t help with the weight – that thing is quite heavy!). It’s like using an off-road vehicle such as a Land Rover to do your grocery shopping: it works, but it isn’t either comfy or practical!
So now I got this, a Raleigh Oakland Plus. It usually retails for around £200-£220, but I got it with a small discount off eBay with free delivery, which was great. The specs aren’t anything out of the ordinary, really standard stuff: 18 (6×3) Shimano Tourney gears, V-brakes on the front and back, and lightweight trekking tyres (this is actually the first bike I own which has these kind of tyres, before I only owned mountain bikes…). It comes fitted with a springy saddle, rear rack and silver mudguards, and that’s about it.
Assembly was relatively easy, especially after having assembled another bike recently, so I knew what to expect: screw in the pedals, fit the handlebars and the seat post, set the front wheel in place. I was pleasantly surprised to find out the brakes were already perfectly tuned from factory, something that didn’t happen with the Dunlop (but that was a good thing, it taught me how to tune V-brakes, which is quite easier than I thought!). One thing with this bike that did annoy me is that they only supplied me with one Allen key, and I needed the size below (I reckon it is the 5mm one) to set some of the components, namely the angle of the handlebar and the seatpost height. One trip to the lab’s toolbox the following morning sorted out the problem, but it was a bit annoying they did not supply something as fundamental as an Allen key (the rest of the tools were supplied, so I imagine this was a failure in the automated distribution of the accessories).
As for the ride itself, I’ve only done about 20 miles in it so my experience is still quite limited. Raleigh offers a five-year warranty on the frame, which is good (I’ve already registered my bicycle, took me a while to actually find the frame number which is in a very unaccessible part of the bike, and the characters themselves are very shallowly marked on the metal, too…). I have the impression that most nasty things that happen to bikes are normally caused by misuse and by storing them in an inappropriate manner – the bike I had before the Dunlop lasted me for 10 years, and it is still running strong! And even the Dunlop, after 700 miles in just 6 months is still in very good condition with some basic maintenance and cleaning, so I imagine the same to happen to this Raleigh. Cherish something, and it will last you a lifetime (that’s what I say about my 20-year-old Fiat… :)).
One thing that I may change in the future is the saddle. One morning a few months after buying the Dunlop I went on a quite lengthy coastal bike ride up to Broadstairs and back (total riding distance was about 55 miles, if I recall correctly…). My legs were OK, given that the track itself is quite flat (a bit of a steep climb after Herne Bay, but that’s about it…), my face was a bit reddish afterwards because the day was quite sunny, but my bum… oh, it took me _days_ to actually regain a proper seating position, as the saddle was simply too hard/small and terribly uncomfortable. I ended up getting another saddle at SportsDirect, which wasn’t terribly expensive (about £9 or so) and was worlds apart from the original one. Returning to the Raleigh, the supplied one seems all right when you look at it (fairly wide, and quite springy too), but I still need to tune the pitch of it, as I keep getting projected towards the front, when it is the back of the saddle which is properly cushioned and it is where I should be seated. I will have to see if changing the pitch helps, otherwise I’ll just get a similar saddle to the one I got for the Dunlop.
As you can see from the images, I’ve already kitted out the machine quite extensively: bought a set of pannier bags off eBay which seem to work better than the ones I had before, because of their simpler design (the other ones I have on the Dunlop are fancier, with multiple pouches and all, but by having zips meant things weren’t going to last for long, which actually happened – some of the pouches are already not closing properly). I also got some lights for it (I have to make a review on the set of back lights I got, that will go on a future post!), a very cheap cycle computer (but which doesn’t constantly crash, which was the case with the other one I have and which had the annoying consequence of having to continuously reinsert all the data, set the clock etc) and a massive-looking U-lock (I had a combination lock before, but this one is way better and sturdier, should serve as proper theft deterrent). I also got a little side mirror which is handy to see the traffic laying behind me (useful when I need to negotiate an obstacle such as a parked car) – I had one before, a round one which you would fit in the handlebar, but the viewing angle wasn’t great, and the position where it had to be fixated meant that, in order to have a proper glimpse of the traffic I would have to move my arms into a very awkward position, otherwise I’d block the reflex! Certainly not ideal…
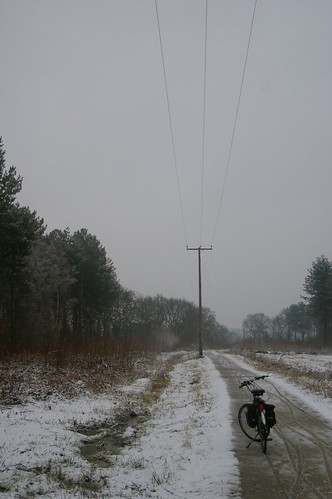
My new Raleigh on National Cycle Route 1, just off Fordwich village, east of Canterbury.
So, as you can see, a nice little bike (you can get it with a 22-inch frame too, if you’re a big fellow – since I’m 5′ 10”, the 19-inch frame is more than enough for me) for a reasonable price. All in all, I think I made a pretty good deal, and these should serve me well in both commuting and leisure, with the added bonus of the trekking tyres not dragging me down like a mountain bike would, so the journey becomes less tiresome, which is always good :).
Hello there, and welcome to my personal web page/blog!
My name is Manuel Marques, and I’m a lecturer in the School of Physics and Astronomy at the University of Kent (United Kingdom). I am also a researcher in the Applied Optics Group at the same institution. My work lies mostly in the area of Applied Optics, namely white light interferometry and its two/three-dimensional variant, optical coherence tomography.
Outside work I'm a keen runner/sculler/rower/cyclist, and I do enjoy being in the outdoors (photographing them is a bonus, too!). Other hobbies include tinkering with things, both big and small (not always with a positive outcome, I must say), travelling, reading, in no specific order.