Vauxhall/Opel Corsa B heating control panel lights servicing

When I first got my car I was a bit surprised for not having any illumination of the heating controls, which can be a problem especially in the Winter, when the days are short and you need to use these controls a lot more!

Anyway, there is illumination indeed, the issue here is that the lighting is designed to stay on regardless of whatever setting you may have on your outside lights. Add to it incandescent bulbs and a horrible procedure to extract them from the panel (more on that later) and no wonder most old Corsas lying around have no functioning lights any more – the owners are coping with it the best way they know, either by turning on the courtesy light or simply by memorising the position of the controls.

Not for me, though! 🙂 – I hate knowing something could be working but it isn’t, but at the same time I hate forking out money on seemingly “little” things (and Vauxhall charges £50+ for the “privilege” of sorting these lights for you!). Hence, armed with some LEDs I got from eBay, my Haynes manual and a few more bits and pieces, I set on trying to sort this out.

Firstly, here is the part in question which holds the lights in place. It definitely doesn’t look familiar to anyone owning one of these cars, as it is buried deep into the fascia:

2014-04-11 14.03.28

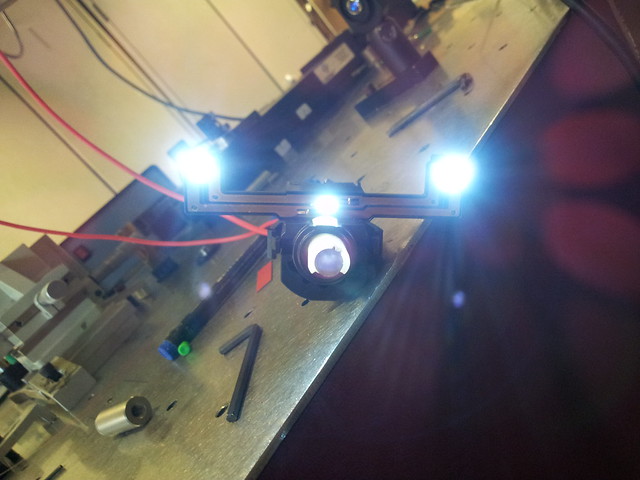
Or, as it sits in the fascia (I took the previous photo as I was testing the lights hooking the part to a 12 V DC power supply),

2014-04-12 14.52.51

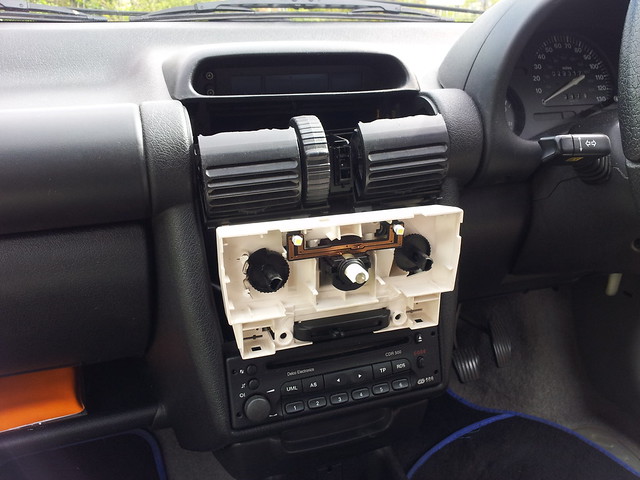
To access this holder all you have to do is follow the instructions from the Haynes manual: pushing the vents down to reveal the screws behind them, which will in turn release the multi-function display on top; and after removing the air recirculation switch and the knobs you can finally get to the lights.

Unfortunately there is something the Haynes manual misses – of these three bulbs only two of them are socketed, given that GM changed the design of this holder in ’97 and with that the central bulb became soldered inside the central switch (the one that controls the fan and the demister). Hence, I had to pry it open in order to get to the bulb,

2014-04-11 09.49.13

thus separating it from the remaining bulbs, which sit on those two arms:

2014-04-11 09.49.32

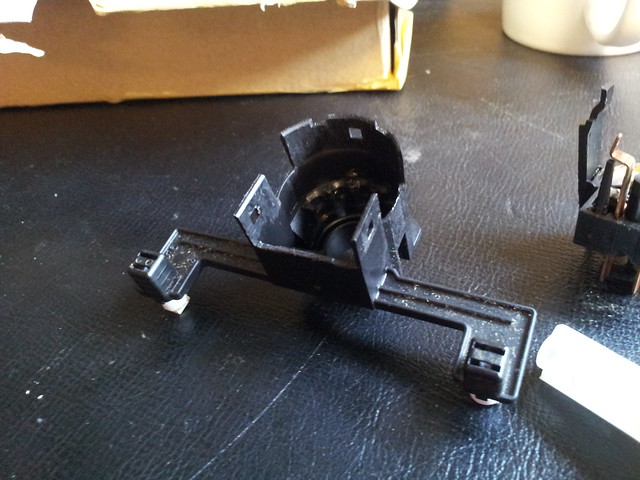
Given that I had intended to replace these lights with LEDs in order to avoid going through this procedure all over again in a year or two’s time, I had to be careful with the polarity. The pins on the back of the assembly are labelled as far as I remember, one of them having a plus sign, hence you can always test with a DC power supply before you take apart half of the car to replace the lights.

My advice – given that you will necessarily have to pry the fan/demister switch open to replace the light, get a used one off eBay or a scrapyard (they should be cheap…) and work on that one – in this way you can just replace the whole unit and be sure it effectively works correctly.

That’s it, folks! Hope you’ve enjoyed the tutorial, I felt I should do one as I kind of missed one when I attempted to do this myself (there were a few images in an enthusiast forum, but they have since been removed…). Any questions, please do ask!

Jazooli web cam

After getting my new “old” monitor I am now running my ThinkPad with the lid closed off its docking station, much to the dismay of my grandad who cannot “see” me now. I then went to get the cheapest webcam that I could find which would be Linux-compatible (and stress-free).

The Jazooli had reviews on Amazon with people successfully running it on Ubuntu with apparently no big dramas, plus it was only £1.99 (+£1.99 P&P 🙂 ), so I went for it. It features not just the camera itself, but a built-in microphone (great since the inbuilt mic of my laptop is on the screen bezel and, as mentioned, the lid is closed..) and 6 LEDs whose brightness you can control through a little knob – for those occasions where you are working in semi-darkness and can’t be bothered to turn a light on if someone calls you on Skype!

It arrived relatively quickly (although I feel that things off eBay with free delivery tend to arrive sooner than the ones from Amazon, even the ones specifically fulfilled by them!), and I immediately set it up on top of my monitor (it has a hook in its base which secures the camera in place, quite a clever design, and it can also be used with a laptop screen!). Plugged it and fired up Cheese to test it – perfect, although its claims of 16 MP are grossly exaggerated – this is a VGA (300k-pixels) sensor, and it can only do VGA at 15 fps anyway, which caused some issues with Cheese. Lowering it to 320×240 seemed to do the trick.

I started having trouble when I fired up Skype and started a video call to test it – Skype was pulling the default configuration and assuming the maximum resolution of the camera, which obviously wasn’t going to happen, and as expected the video feed froze and crashed.

After editing the Skype configuration for my Skype name (under ~/Skype/yourskypename/config.xml ) and adding the following tags to the file,

<Video>
 <CaptureHeight>240</CaptureHeight>
 <CaptureWidth>320</CaptureWidth>
 <Device>/dev/video1</Device>
 <Fps>25</Fps>
 </Video>

I fired up Skype again and hoped for the best. Nope, it was still happily pushing the video feed at full resolution and obviously crashing. Moreover, with Google Hangouts I had exactly the same issue, which led me to think that maybe this was something transversal to all of these programs (but Cheese). After doing a bit of research and installing some Video4Linux configuration/testing software, I did what normally solves 99% of the problems I have when running a 64-bit Linux system – symlink libraries, in this case v4l1compat.so, which existed under /usr/lib/libv4l but not under /usr/lib64/libv4l.

And that seemed to do the trick – both Skype and Hangouts now work perfectly with no frozen video. And to top it off, this camera behaves much better than the ThinkPad’s integrated one, both in terms of white balance (I no longer look like I have liver disease, the other camera made me look so yellow!) and low-light performance (the camera would just shut itself off if the light level was below a certain threshold!).

It gave me some trouble in the end, but nothing major (and probably related from running a 64-bit version of Fedora… 😛 ). For 2 quid it is a good buy indeed – obviously not HD, but my family is not complaining… 🙂